 LH-
Jetronic
LH-
Jetronic
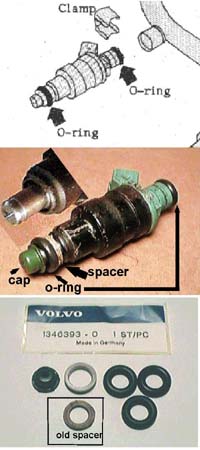
Injector
This is a photo of an injector from my
B230FT
The top left corner shows the tip of the
injector with the cap, o-ring and spacer removed. I have always
had to destroy the cap in the process of removal. I use a heat
gun to soften the plastic making it easy to remove. The spacer
seems to take the heat ok. It just slides off once the cap is
removed.
This is Volvo's "seal ring kit".
For my engine it is part # 1346393-0 and lists for $5.30. You
will need a kit for each injector. The kit comes with a new cap,
spacer and 3 o-rings. You only need two o-rings so you will have
some spares. The spacer that came with my kit was larger than
the original. I questioned the parts clerk about this and he went
back to talk with one of the mechanics. The mechanic said that
it is too large and they always use the old one!

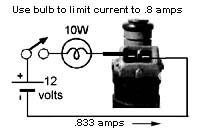
Do not
put 12 volts directly on the injector. My injectors measured about
3 ohms. With the 10 watt bulb limiting the current to .8 amps,
the voltage drop across the bulb causes the injector to see about
2.4 volts. Closing the switch will cause the injector to open
and atomize liquid forced through it.
Cleaning the injectors.
I have used carburetor cleaner to do this
job. I squirt a little into the top of the injector. After letting
it soak for a few minutes, I apply power to the injector at the
same time force compressed air through the unit. The liquid is
atomized as it leaves the bottom.
Use extreme caution while using carb cleaner
around voltage. It is a good idea to keep the switch away from
the area that will become wet with the cleaner.
I have done this several times with satisfactory
results.
What About Injector Cleaning?